Table of Contents
Laser Cutter #2
TRAINING REQUIRED BEFORE USE.
(Note: Access control is ad-hoc, Ask someone to add you after you have received a walkthrough.)
Model JD90125
Bed: 1250x900mm
Laser: 100-150W (130W rated, 150W peak) glass CO2
Accessories: CW-3000 chiller, rotary axis

See also:
Save your project file on the local disk if it's complex otherwise the software will be excessively slow (because the latency of the network share slows down the compile process).
Safety
There is always a fire risk when using the laser. The laser should not be left unattended during a cut.
Failure to pay attention to the laser can result in this:

Prices
See prices.
Recommended Settings
Please add your own preferred settings here, but do not edit the existing entries. If you believe a setting is inappropriate, use strikeout and add a new entry with your corrections. Add your name to the notes so that other users can make an informed decision where there is a conflict of recommendations.
The test were done in the centre of the cutting bed.
| Material | Cut Speed | Cut Power | Notes | |
|---|---|---|---|---|
| Acrylic | 1mm | 30 | 40 | Miron |
| 2mm | 28 | 100 | Miron | |
| 3mm | 17 | 100 | David | |
| 4mm | 15 | 100 | Miron | |
| 5mm | 12 | 100 | Miron | |
| 8mm | 4 | 100 | David | |
| 10mm | 3 | 100 | Miron | |
| Ply | 3mm | 30 | 100 | Miron - speed 50 cuts fine, but stutters at curves, 30 is safer |
| 4mm | 20 | 100 | Miron | |
| 6mm | 9 | 100 | Miron | |
| MDF | 2mm | 30 | 100 | Miron |
| 3mm | 22 | 100 | Miron | |
| 4mm | 16 | 100 | Miron | |
| 6mm | 10 | 100 | Miron | |
| Laminate | 1.5mm | 50 | 100 | Miron |
| 3mm | ||||
| PTFE (Teflon) | 1mm | 35 | 100 | Mike |
| Card (200gsm) | 40-55 | 30 | Scott | |
| Card fold line (200gsm) | 100 | 30 | Scott | |
| Paper | ||||
| Material | Engrave Speed | Engrave Power | Notes |
|---|---|---|---|
| Acrylic | 350 | 50 | Miron |
| Ply | 500 | 30 | Bart |
| MDF | 350 | 50 | Miron |
| Laminate | 350 | 50 | Miron |
| Card (200gsm) | 500 | 30 | Scott |
Minimum power setting for the laser to turn on: 19
To Do
Before general use:
- Update docs:
- If Z-axis needs to be moved, take care not to crash into the nozzle. Releasing the nozzle locking ring will allow the nozzle to collapse instead of crashing.
Soon, but don't wait:
- Build and install monitoring system (laser usage, temperature logging)
Later:
- Order spares: silicone tubing,
mirrors, lens,rotary attachment o-rings Replace broken acrylic cover on front-loading slot.make the two halves of front loading slot not fall off by cutting an extra slot into each of them and adding an extra screw to secure them in the middle- Design and make a better rotary tool
Guide for existing laser cutter users
What’s changed?
- The bed is larger, up to 1250x900mm.
- The Z axis is deeper, so large items can be engraved.
- The laser is more powerful (estimated at 100W or more) so cutting is faster or thicker materials may be used.
- A rotary axis accessory can engrave cylindrical items.
What do I need to know about using it?
- We now have access control. All members will have access to start with (we might make a formal training record later). Non-members will need a member to enable the laser cutter before use.
- Focusing the laser (for different materials) is slightly different. The nozzle can be adjusted without moving the Z axis. Users must still know how to adjust the Z axis in case it's been left too high or too low.
- The enclosure is very large and smoke/fumes take longer to clear. Leave the case closed for 10 seconds after cutting to allow the extraction system to catch up.
- The air assist is adjustable. Always make sure that it's enabled (on the top control panel) and that the valve (on the right hand side) is open. It's okay to reduce the air assist for delicate materials like paper, but there should always be some air flow enabled to protect the lens.
- The window is tinted as all hell. This should absorb the infra-red laser and most of the light from the laser. Emphasis on the should.
Checklists
Powering-Up
- check that the bed is clear of obstructions
- check that the Z-axis is below the level of the cutting head (we don’t want the head to crash when it attempts to home itself)
- make sure that all the access panels are closed
- switch-on the laser cutter at the wall
- log-in with your access token
- press the green start button
- check that the air assist is switched on and that the valve on the right-hand side is fully open
If it won't start:
- check that the door on the right-hand side is properly closed
- check the emergency stop button (twist clockwise to reset)
- check that the access control is logged-in (should say Idle or Active)
Switch off the cutter and report a fault:
- if chiller alarm sounds for more that a few seconds
- if the extraction fan makes flapping/grinding noises
Before Cutting
- position the material on the bed and move the nozzle over the material
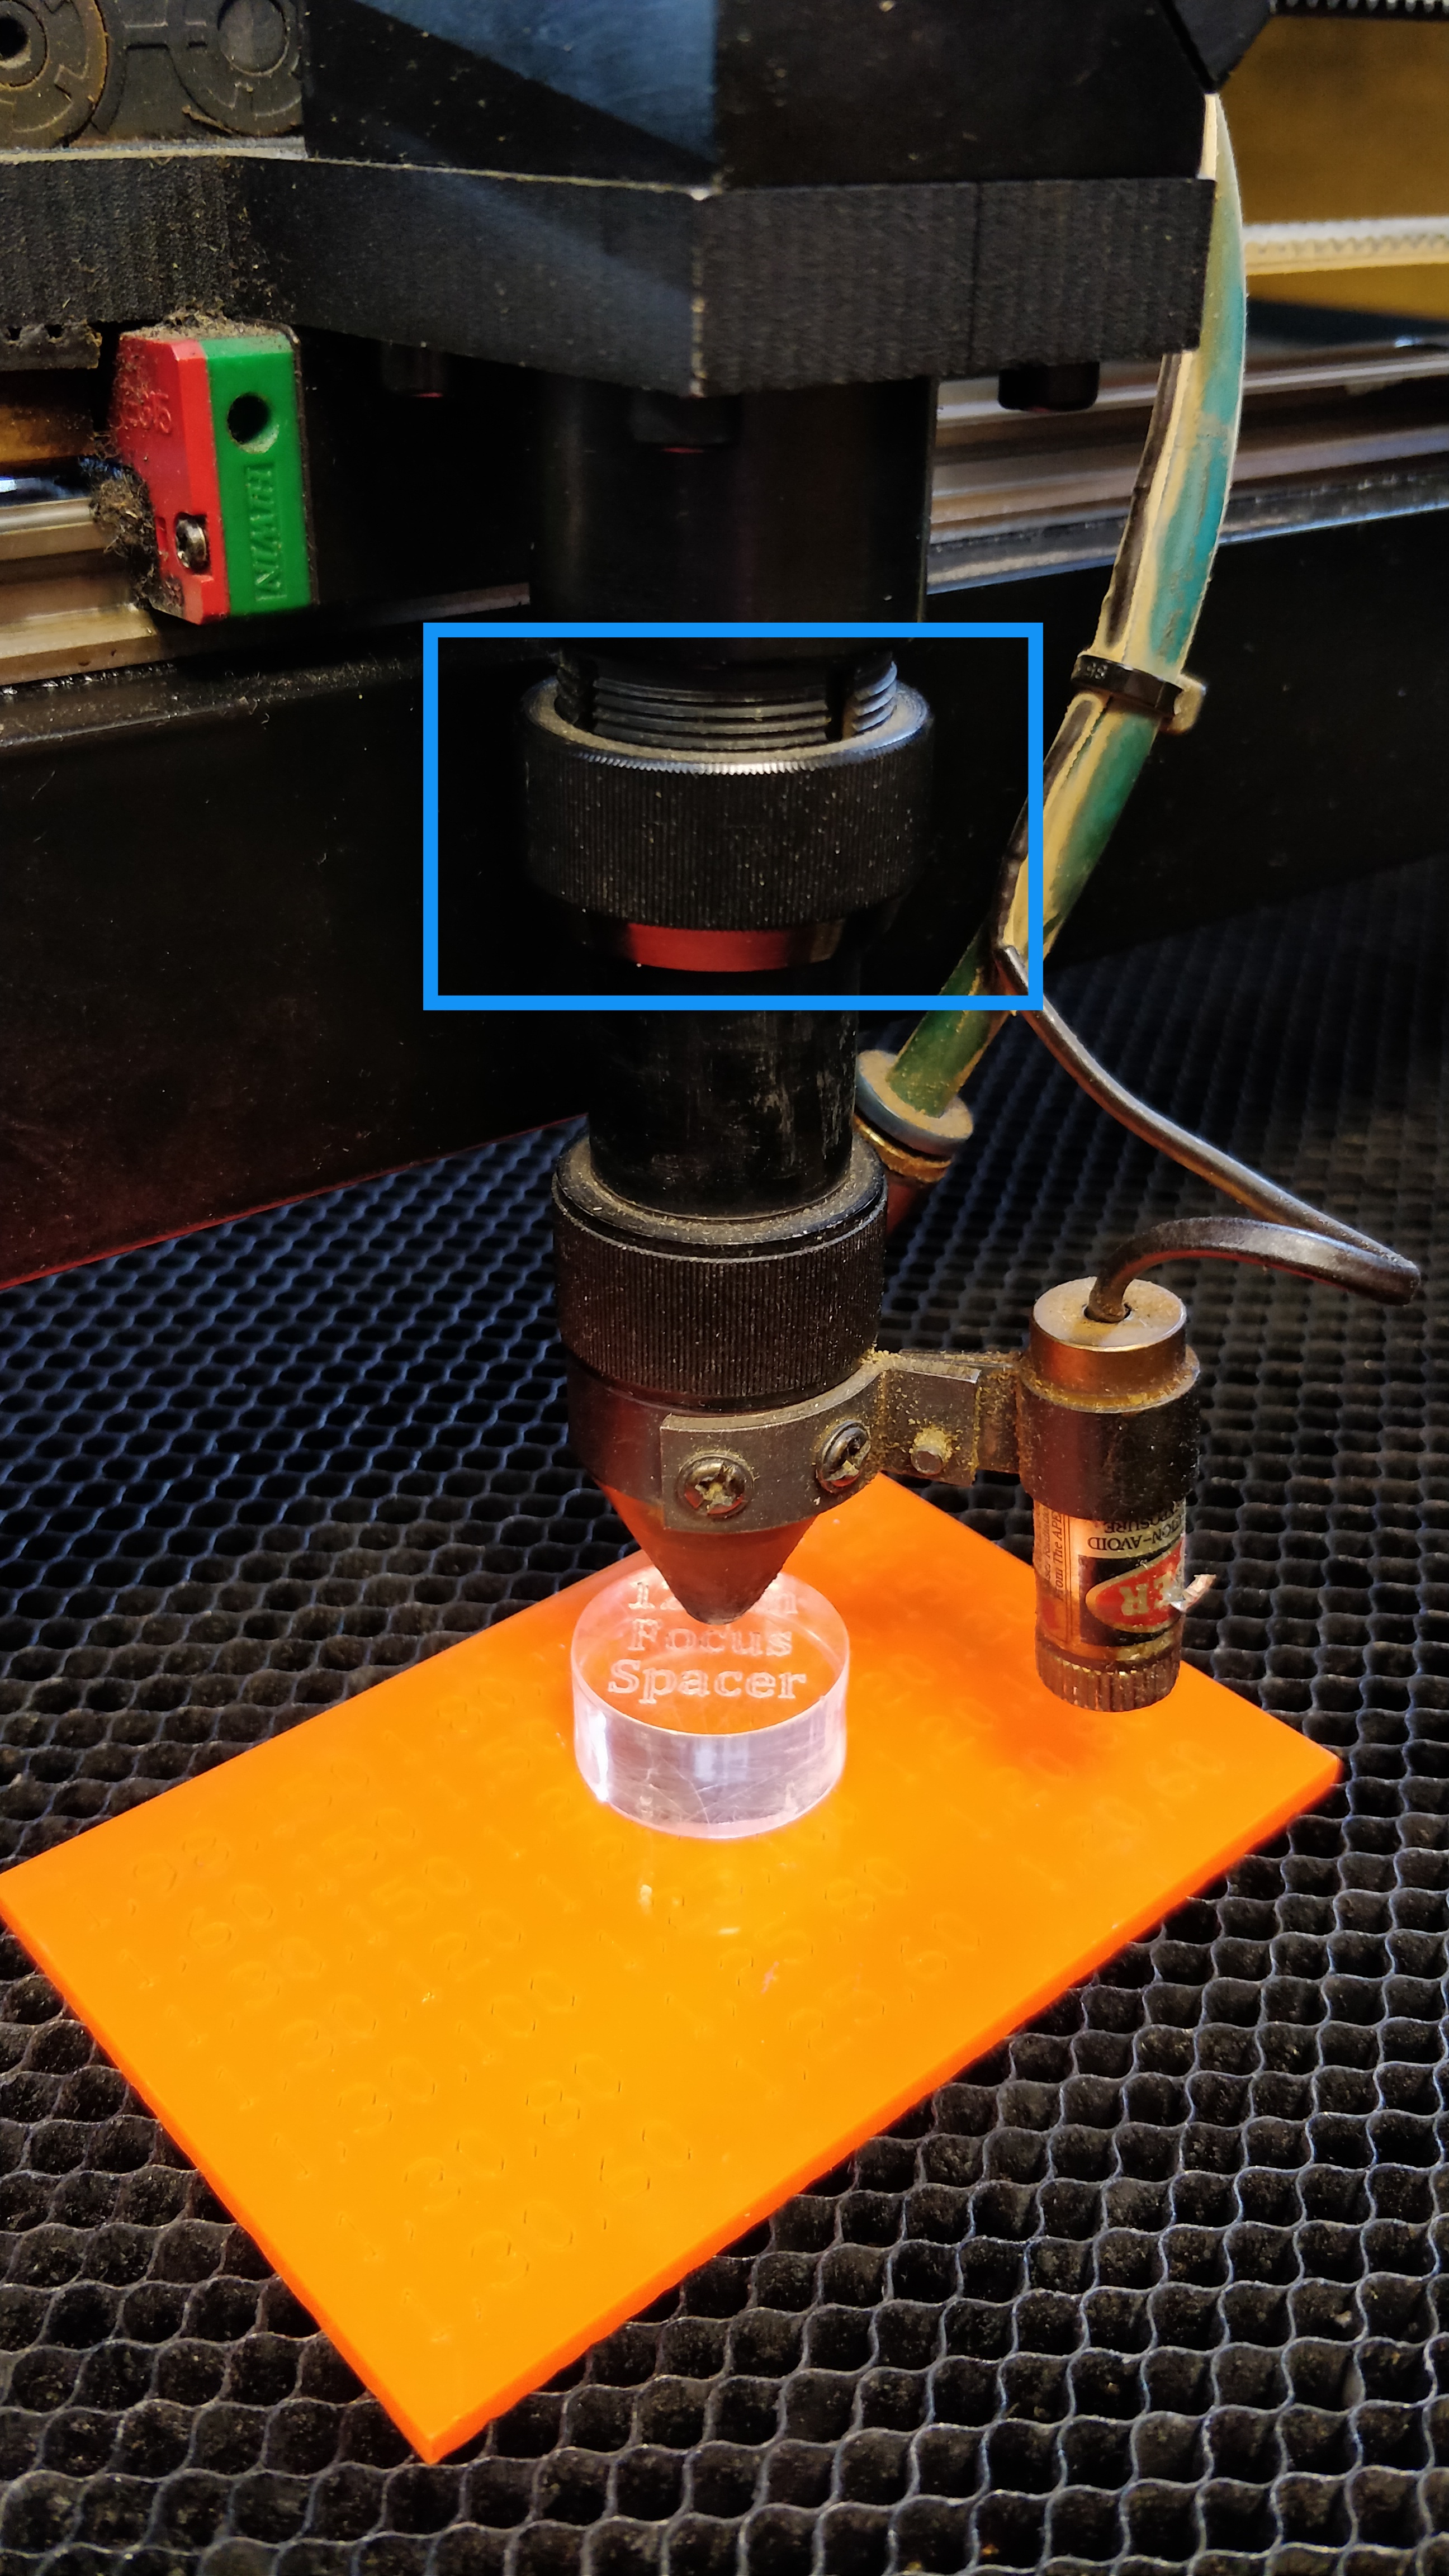
- release the locking ring on the nozzle (turn locking ring clockwise)
- place the 12mm focus jig between the nozzle and the material, and lower the nozzle down to touch it
- if there isn't enough available movement of the nozzle, remove the jig, adjust the Z axis and try again
- re-secure the nozzle and remove the jig (turn locking ring anti-clockwise)
- check that the air assist is switched on and that the valve on the right-hand side is fully open
- the air assist may be reduced for delicate materials such as paper and card, but some air should be kept on to protect the lens from smoke
After Use
- press the datum button to return the laser nozzle to it's home position
- leave the system running for a few minutes to allow the fumes to be extracted and the tube to be cooled-down
- remove any scraps from the cutting bed (use the vacuum cleaner if the pieces are small enough to get stuck in the honeycomb)
- press the red stop button
- press the logout button on the access controller
Troubleshooting
System won't start up
- check the emergency stop (twist clockwise to reset)
- check that the right-hand access panel (electrical controls) is closed properly
- check that the rear access panel (laser power supply) is closed properly
- check that the access controller is logged-in
Nozzle quickly "jumps" and looses alignment while moving between cuts
In LaserCut 5.3, File>Machine Options>Worktable Make sure “Quick speed” is set to a sensible value like 300, work-acc to 500 and space-acc to 500
Nozzle moves but doesn't cut
- check that the lid is closed (the microswitch should make a click as it closes)
- check that the chiller is powered-up, showing a green Normal status and that it is connected to the laser cutter
- check that the correct power level has been selected
Chiller alarm sounds
At startup: if the alarm sounds for more than a couple of seconds, TURN IT OFF and report a fault. There may be insufficient water, there may be a blockage or a pump failure.
During use: if the alarm sounds during normal use:
- pause the cutting session
- check the temperature on the chiller's front panel (it should be in the range 10-23℃, roughly room temperature)
- if the temperature is too high, try waiting for the chiller to bring the temperature down
- if the temperature doesn't fall then there is probably a fault
- even if the temperature does fall, REPORT A FAULT as the chiller should normally be able to keep up
Other Specifications (for maintenance)
Water tubing: silicone, 12mm OD, 8mm ID, 2mm wall
Chiller: CW-5200
Air assist compressor: Hailea ACO-328
Air assist tubing: silicone, 12mm OD, 8mm ID, 2mm wall
Mirrors: 3x 25mm diameter
Lens: ZnSe, 20mm diameter, 50.8mm focus
Laser PSU: Reci DY20
Laser tube: ZN-1650 (130W rated power, 150W max, 30mA)
Resources
- jd90125-lasercut5.zip - software supplied with laser cutter
- lasercut53-backup-20180315.zip - backup of previous owner's LaserCut53 installation
Access Control
The access control unit will be external to the laser cutter chassis and connected by a cable:
- GND
- 5V supply (from laser cutter, always on)
- Enable power-up (open drain)
- Current clamp A
- Current clamp B
- (additional pins may be required for better active/idle detection)
Monitoring
An external unit will contain an ESP8266 and LCD. It will connect to the main chassis by cable:
- GND
- 5V supply (from laser cutter, always on or switched)
- One wire bus for DS18B20 temperature sensors
- I2C SDA
- I2C SCL
- Laser enable pin
- Laser power level pin
- Laser powered-up signal?
- Laser cutter in use signal?
The monitoring device will:
- Log laser tube time
- Log temperatures (ambient, coolant out/return, bed, exhaust)
- Detect cutting sessions and report the most recent on the LCD
- Potentially, log fume/particulate levels
Log
2018-03-25:
- Moved into G2 and re-assembled
2018-03-30:
- Extraction installed, laser tested.
2018-04-11:
- New alignment laser fitted. Wiring partially replaced and re-soldered. Air tube re-secured.
- Laser tube disinfected with water/Milton for an hour. Water channels still appear dirty.
- Optical power tested.
- 90% = 40mA = 132W
- 66% = 30mA = 126W
- 55% = 25mA = 116W (selected)
2018-05-04:
- Proof-of-concept LED strip lighting fitted - to be replaced with a proper solution if it proves useful
2018-05-14:
- Internal ducting upgraded (PU ducts, internal combiner to 150mm and 150mm to the blower). Significant improvement to extraction, but more testing is still required to see whether fumes are re-entering via window.
2018-05-15:
- Mike found a leak in the flexible square section after the blower. It has been plugged with hot glue and seems to be fixed. The smell of fumes in the corner while cutting is reduced now, but still there. There may be a small leak where the square tube seals against the wood panel (on the left behind the blower).
2018-05-28:
- Bed levelled.
2018-07-14:
- New tinted window fitted: it is now safe to stare directly at the beam. Also at some point proper LED lighting was installed but wasn't logged.
2018-07-19:
- The bed level was checked and it's within 1mm all over. The axes were checked and they're within ~0.2mm over ~200mm.
2018-09-22:
- Tube #2 (from Smoke and Mirrors) installed. All mirrors realigned to a reasonable (but not perfect) standard. Power level set to 33%.
2020-03-03:
- Fettled the rear safety switch for the door to make it work reliably again.
2020-08-08:
- The mirrors were realigned, the actual laser tube was sitting about 2mm too low and the field was slightly crooked with the top right corner shooting too high. It seems to that the body of the laser had bent back to its original geometry from the time we've got the laser in 2018. It has probably happened due to the different location and maybe better floor. The intermittent issue of the tube switching off could not be replicated, the HV wires were checked but no obvious burn or oxidation marks have been identified.
2021-08-05:
- “I recently found that pressing the arrow buttons would only “jog” it by a centimetre at a time and I couldn't get it to move continuously while holding it down” (Julian)
- “I think the wire harness for the Y axis is troublesome. I think the motor wires are still fine but the limit switch is dead. Also - after jiggerypockering the X axis limit switch wire the issue describes by Julian has gone (it shouldn't but it did). I suggest we get good quality silicone wires, the AWG22 for all signal stuff and 4way AWG 16-18 for the stepper motors (they are 2A so need more meat) and gather in a group of 2-3 members to rewire the motors, laser pointer and all the limit switches.” (Costa)
2021-11-24:
- “Both Y and Z axes weren't moving - I spent a while with it tonight and figured out and fixed the Y axis - stepper driver wasn't getting power - but haven't been able to fix Z. It's not the same problem, Z driver is lighting up, it just won't move.” (Julian)
2021-12-02:
- “Laser is fixed, the connector that plugs into the motherboard got loose and signal wasn't reaching the driver. Tighten up and homed it. All works fine now. Obviously checked all others too. All cool.” (Costa)
2022-05-19:
- “Having an issue with one of the axis (I believe x? The front to back one) was not working after removing the rotary (and obviously resetting the switches to normal position)” (Diarmaid)
- “The laser is fixed, the big switch [that switches between the rotary axis and the normal axis] needs to be looked at in the future.” (Costa)